|
|
| Register | Forums | Blogs | Today's Posts | Search | Donate |
 |
 |
 |
|
#1
 10-09-2011, 09:49 PM
|
|||
|
|||
|
I recently acquired a set of Chuck Warner's TR Sear Jig. TR being true radius. This is a concept for stoning the sear to the radius it pivots on and produces the only true neutral sear. When the sear is prepped as per the original specs it is actually slightly negative, and can also be angled to be positive. Much discussion has been done over this, and the radius idea has been discussed. Chuck Warner did something about it, and is producing center-less ground O-1 discs of the exact size, and hole needed to sandwich a sear, and stone it to match the radius.
The hammer prep is important as well and a huge variety of trigger pull feels and weights can be had. I started with a Nowlin hammer with .020"hooks, leveled in the manual way of stoning with a feeler gauge on the flat. The face of the hooks was also stoned and the tips given a slight radius. You can think of it as dulling the tips slightly. The first thing I do with a new sear is lay it on it's side's on 1000 grit paper on a flat surface and do a figure 8, 4 or 5 times to remove any burrs and smooth the surface.  Here's the fixture discs and sear and sear pin.  I assembled them as per the directions that come with them. You use the sear pin to hold the sear between the discs and clamp in a smooth faced vise. The sear pin head isn't quite flush with the discs so when clamped it is held securely and can't turn when stoning.  A great hint in the directions is to draw a line with a felt tip pen across the discs and sear nose. This will give an indication of your progress when stoning down to the discs. 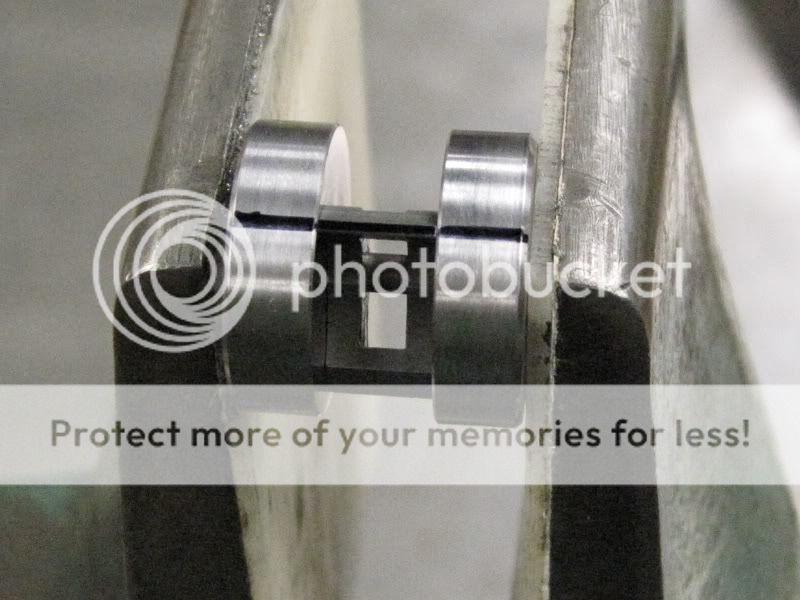 I had about a .001" or so of sear to profile so started with a fine India stone, and went just till I could see by the ink I was close.  A few strokes later and you can see the progress.  At this point I switched to the white ceramic stone to polish.  You will also stone/polish the discs, but is of very little consequence for future use. I think you could probably do 100 sears without appreciable wear.  You will notice a slight irregular escape edge until you stone a relief angle. This can be just a few strokes to straighten the edge, or 30% or more to shorten the pull.  At this point I assembled the sear with the nose inked, the hammer, and dry fired a few times to check contact.  Further stoning of the hooks can increase equal contact, but this only took about 10-15 minutes, and the pull is very nice and clean. More in depth tuning can be done, but this is a very impressive pull for the first time through. Smooth, and clean! LOG
__________________
CBOB:0517 
|
| The Following User Says Thank You to log man For This Useful Post: | ||
Wilsoncrafter (11-25-2015) | ||


 Threaded Mode