 |
|
| Register | Forums | Blogs | Today's Posts | Search | Donate |
 |
 |
 |
|
#1
|
|
Most times when you have trouble feeding or ejecting Empty cases, it isn't what you think. Magazines can cause alot of problems but, your Extractor and Ejector can too. 1911s are controlled-feed systems and the Extractor is a very important part of that.
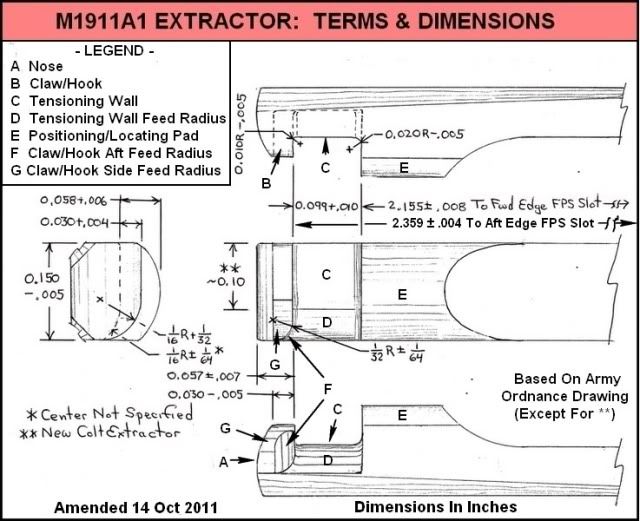
As the slide comes forward and strips a round out of the magazine, it first contacts the ramp and skips upward, that's right, it doesn't slide up the ramp. When the nose strikes the top of the hood it starts to straighten out the round. The Rim then slides up under the Extractor and onto the breechface,held in place by said Extractor. If the Extractor is too tight(Too much tension) The round can't slide up behind the hook and you end up with a three-point Jam as the lobe of the Extractor pushes the rim and causes the nose to hit the ramp again. Too loose(Not enough tension) and the Extractor loses control of the round and you get a partial feed-jam. There's a simple test for Extractor-Tension. All you need is the slide and a loaded round. Hold the slide in your hand and insert the rim of the round under the hook of the Extractor from below. It should fit a little loose but hold the round as you lightly shake the slide and even turn it upside down. If it's too tight, simply pull the Extractor halfway out and gently bend it to the right a little bit and try again. If it's too loose, bend it a little bit to the left and try again. Next, we'll tune the Extractor lobe and hook. If you look at the diagram below you'll see that a USGI-Spec Extractor has something most commercial Extractors don't, a breakaway angle on the bottom of the hook.( See: #F on the diagram) This is very simple to do and only requires a small file. What this angle does is help direct the rim into the Extractor hook. This is simple filin and only takes about a minute to do but, your 1911 will feed alot more reliably with it. Next, we're going to shape the pad right behind the hook. (See: #C and D)Rounding it is a more accurate term. You need to get rid of the line you see about one-quarter of the way up the pad from the bottom and round it down to about half of the flat on the side. Takes about a minute to do. Okay, now you have to stick the Extractor back into the slide for a minute. We're going to check to make sure the lobe isn't contacting the case inside the rim. Slide the loaded round back under the hook and look to see if it's contacting the case above the hook. If it is, look at the diagram again(See: #A) and take a little off the lobe where it contacts.Try it again, keep going gently and a little at a time until it doesn't touch the case. Okay, take the Extractor out again and grab a couple of pipe-cleaners and your Hoppes and clean the gunk out of the Extractor-tunnel. Put it back together. you're done. Here's the Diagram for the Extractor-nose.  Okay, if you're having Ejector problems and you have an extended Ejector there's a cure. Most of the newer 1911s come from the factory with lowered and flared Ejection-ports but, not all of them do. Plus, even those that do have problems sometimes. This is why Extended Ejectors were developed. The Extended Ejector starts contacting the rim sooner and kicks it out higher. The problem with this is sometimes they kick the case straight back and contact your skull. Most Extended Ejectors come with a squared nose and ejection is variable with them. some work okay some don't. One famous company even has it bass-ackwards and makes an Ejector nose that drives the case down into chamber-area. I won't mention their name but Bill Wilson runs it. Okay, what can you do? Well, if you look at the diagram below you'll see quickly that, the lower on the rim the nose contacts, the higher it will kick out the case. This is for Extended Ejectors, I'll explain what can be done to short standard Ejectors later. So, take out that little file again. Looking at the diagram you can see the green lines, this is what you want the nose to look like. Basically, it's a 10-degree downward and outward angle. This will contact the rim at the lowest point and kick the case upward and hopefully, over your head. Okay, now that we've made the case eject higher, let's direct it a little. Looking down on the Ejector from the top(This is for both Extended Ejectors and standard Ejectors), you want to file a slight angle on the inside -edge of the nose(The side closest to the inside of the gun  ). This angle has to go the entire side of the nose. This will direct the case to the right, usually cases with this angle will put the pile at about 4 O'Clock to the right. ). This angle has to go the entire side of the nose. This will direct the case to the right, usually cases with this angle will put the pile at about 4 O'Clock to the right.See? This stuff isn't that hard to do people. Here's the ejector Diagram. 
__________________
Diligentia, Vis, Celeritas COTEP#CBOB0428 NRA,GCA,OGCA, USAF,Msgt.(Ret.) Last edited by Dave Waits; 12-28-2012 at 11:27 PM. |
| The Following 6 Users Say Thank You to Dave Waits For This Useful Post: | ||
boatdoc (03-28-2019), KeystoneWeaponBK (02-21-2014), Lonestar grips. (02-21-2014), NAMVET72 (04-06-2015), sdmc530 (04-05-2015), Xbonz (02-21-2014) | ||